引言
书接上文,前面我们分别介绍了 Dubbo 的设计思想,分析了微内核的实现方案,服务导出与引入、以及集群容错方面的代码。经过前文的铺垫,本篇文章我们终于可以分析服务调用过程了。
技术内幕
实现细节
服务调用过程
在前面的文章中,我们分析了 Dubbo SPI、服务导出与引入、以及集群容错方面的代码。经过前文的铺垫,本篇文章我们终于可以分析服务调用过程了。Dubbo 服务调用过程比较复杂,包含众多步骤,比如发送请求、编解码、服务降级、过滤器链处理、序列化、线程派发以及响应请求等步骤。接下来我们将会重点分析请求的发送与接收、编解码、线程派发以及响应的发送与接收等过程。
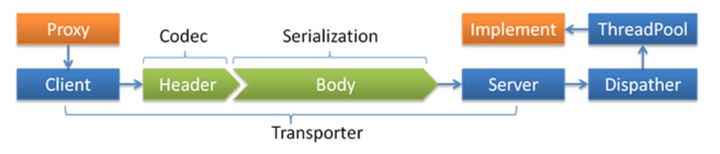
首先服务消费者通过代理对象 Proxy 发起远程调用,接着通过网络客户端 Client 将编码后的请求发送给服务提供方的网络层上,也就是 Server。Server 在收到请求后,首先要做的事情是对数据包进行解码。然后将解码后的请求发送至分发器 Dispatcher,再由分发器将请求派发到指定的线程池上,最后由线程池调用具体的服务。这就是一个远程调用请求的发送与接收过程。至于响应的发送与接收过程,这张图中没有表现出来。对于这两个过程,我们也会进行详细分析。
服务调用方式
Dubbo 支持同步和异步两种调用方式,其中异步调用还可细分为“有返回值”的异步调用和“无返回值”的异步调用。所谓“无返回值”异步调用是指服务消费方只管调用,但不关心调用结果,此时 Dubbo 会直接返回一个空的 RpcResult。若要使用异步特性,需要服务消费方手动进行配置。默认情况下,Dubbo 使用同步调用方式。
本节以及其他章节将会使用 Dubbo 官方提供的 Demo 分析整个调用过程,下面我们从 DemoService 接口的代理类开始进行分析。Dubbo 默认使用 Javassist 框架为服务接口生成动态代理类,因此我们需要先将代理类进行反编译才能看到源码。这里使用阿里开源 Java 应用诊断工具 Arthas 反编译代理类,结果如下:
/**
 * Arthas 反编译步骤:
 * 1. 启动 Arthas
 *    java -jar arthas-boot.jar
 *
 * 2. 输入编号选择进程
 *    Arthas 启动后,会打印 Java 应用进程列表,如下:
 *    [1]: 11232 org.jetbrains.jps.cmdline.Launcher
 *    [2]: 22370 org.jetbrains.jps.cmdline.Launcher
 *    [3]: 22371 com.alibaba.dubbo.demo.consumer.Consumer
 *    [4]: 22362 com.alibaba.dubbo.demo.provider.Provider
 *    [5]: 2074 org.apache.zookeeper.server.quorum.QuorumPeerMain
 * 这里输入编号 3,让 Arthas 关联到启动类为 com.....Consumer 的 Java 进程上
 *
 * 3. 由于 Demo 项目中只有一个服务接口,因此此接口的代理类类名为 proxy0,此时使用 sc 命令搜索这个类名。
 *    $ sc *.proxy0
 *    com.alibaba.dubbo.common.bytecode.proxy0
 *
 * 4. 使用 jad 命令反编译 com.alibaba.dubbo.common.bytecode.proxy0
 *    $ jad com.alibaba.dubbo.common.bytecode.proxy0
 *
 * 更多使用方法请参考 Arthas 官方文档:
 *   https://alibaba.github.io/arthas/quick-start.html
 */
public class proxy0 implements ClassGenerator.DC, EchoService, DemoService {
    // 方法数组
    public static Method[] methods;
    private InvocationHandler handler;

    public proxy0(InvocationHandler invocationHandler) {
        this.handler = invocationHandler;
    }

    public proxy0() {
    }

    public String sayHello(String string) {
        // 将参数存储到 Object 数组中
        Object[] arrobject = new Object[]{string};
        // 调用 InvocationHandler 实现类的 invoke 方法得到调用结果
        Object object = this.handler.invoke(this, methods[0], arrobject);
        // 返回调用结果
        return (String)object;
    }

    /** 回声测试方法 */
    public Object $echo(Object object) {
        Object[] arrobject = new Object[]{object};
        Object object2 = this.handler.invoke(this, methods[1], arrobject);
        return object2;
    }
}
如上,代理类的逻辑比较简单。首先将运行时参数存储到数组中,然后调用 InvocationHandler 接口实现类的 invoke 方法,得到调用结果,最后将结果转型并返回给调用方。关于代理类的逻辑就说这么多,继续向下分析。
public class InvokerInvocationHandler implements InvocationHandler {

    private final Invoker<?> invoker;

    public InvokerInvocationHandler(Invoker<?> handler) {
        this.invoker = handler;
    }

    @Override
    public Object invoke(Object proxy, Method method, Object[] args) throws Throwable {
        String methodName = method.getName();
        Class<?>[] parameterTypes = method.getParameterTypes();

        // 拦截定义在 Object 类中的方法(未被子类重写),比如 wait/notify
        if (method.getDeclaringClass() == Object.class) {
            return method.invoke(invoker, args);
        }

        // 如果 toString、hashCode 和 equals 等方法被子类重写了,这里也直接调用
        if ("toString".equals(methodName) && parameterTypes.length == 0) {
            return invoker.toString();
        }
        if ("hashCode".equals(methodName) && parameterTypes.length == 0) {
            return invoker.hashCode();
        }
        if ("equals".equals(methodName) && parameterTypes.length == 1) {
            return invoker.equals(args[0]);
        }

        // 将 method 和 args 封装到 RpcInvocation 中,并执行后续的调用
        return invoker.invoke(new RpcInvocation(method, args)).recreate();
    }
}
InvokerInvocationHandler 中的 invoker 成员变量类型为 MockClusterInvoker,MockClusterInvoker 内部封装了服务降级逻辑。下面简单看一下:
public class MockClusterInvoker<T> implements Invoker<T> {

    private final Invoker<T> invoker;

    public Result invoke(Invocation invocation) throws RpcException {
        Result result = null;

        // 获取 mock 配置值
        String value = directory.getUrl().getMethodParameter(invocation.getMethodName(), Constants.MOCK_KEY, Boolean.FALSE.toString()).trim();
        if (value.length() == 0 || value.equalsIgnoreCase("false")) {
            // 无 mock 逻辑,直接调用其他 Invoker 对象的 invoke 方法,
            // 比如 FailoverClusterInvoker
            result = this.invoker.invoke(invocation);
        } else if (value.startsWith("force")) {
            // force:xxx 直接执行 mock 逻辑,不发起远程调用
            result = doMockInvoke(invocation, null);
        } else {
            // fail:xxx 表示消费方对调用服务失败后,再执行 mock 逻辑,不抛出异常
            try {
                // 调用其他 Invoker 对象的 invoke 方法
                result = this.invoker.invoke(invocation);
            } catch (RpcException e) {
                if (e.isBiz()) {
                    throw e;
                } else {
                    // 调用失败,执行 mock 逻辑
                    result = doMockInvoke(invocation, e);
                }
            }
        }
        return result;
    }

    // 省略其他方法
}
服务降级不是本文重点,因此这里就不分析 doMockInvoke 方法了。考虑到前文已经详细分析过 FailoverClusterInvoker,因此本节略过 FailoverClusterInvoker,直接分析 DubboInvoker。
public abstract class AbstractInvoker<T> implements Invoker<T> {

    public Result invoke(Invocation inv) throws RpcException {
        if (destroyed.get()) {
            throw new RpcException("Rpc invoker for service ...");
        }
        RpcInvocation invocation = (RpcInvocation) inv;
        // 设置 Invoker
        invocation.setInvoker(this);
        if (attachment != null && attachment.size() > 0) {
            // 设置 attachment
            invocation.addAttachmentsIfAbsent(attachment);
        }
        Map<String, String> contextAttachments = RpcContext.getContext().getAttachments();
        if (contextAttachments != null && contextAttachments.size() != 0) {
            // 添加 contextAttachments 到 RpcInvocation#attachment 变量中
            invocation.addAttachments(contextAttachments);
        }
        if (getUrl().getMethodParameter(invocation.getMethodName(), Constants.ASYNC_KEY, false)) {
            // 设置异步信息到 RpcInvocation#attachment 中
            invocation.setAttachment(Constants.ASYNC_KEY, Boolean.TRUE.toString());
        }
        RpcUtils.attachInvocationIdIfAsync(getUrl(), invocation);

        try {
            // 抽象方法,由子类实现
            return doInvoke(invocation);
        } catch (InvocationTargetException e) {
            // ...
        } catch (RpcException e) {
            // ...
        } catch (Throwable e) {
            return new RpcResult(e);
        }
    }

    protected abstract Result doInvoke(Invocation invocation) throws Throwable;

    // 省略其他方法
}
上面的代码来自 AbstractInvoker 类,其中大部分代码用于添加信息到 RpcInvocation#attachment 变量中,添加完毕后,调用 doInvoke 执行后续的调用。doInvoke 是一个抽象方法,需要由子类实现,下面到 DubboInvoker 中看一下。
public class DubboInvoker<T> extends AbstractInvoker<T> {

    private final ExchangeClient[] clients;

    protected Result doInvoke(final Invocation invocation) throws Throwable {
        RpcInvocation inv = (RpcInvocation) invocation;
        final String methodName = RpcUtils.getMethodName(invocation);
        // 设置 path 和 version 到 attachment 中
        inv.setAttachment(Constants.PATH_KEY, getUrl().getPath());
        inv.setAttachment(Constants.VERSION_KEY, version);

        ExchangeClient currentClient;
        if (clients.length == 1) {
            // 从 clients 数组中获取 ExchangeClient
            currentClient = clients[0];
        } else {
            currentClient = clients[index.getAndIncrement() % clients.length];
        }
        try {
            // 获取异步配置
            boolean isAsync = RpcUtils.isAsync(getUrl(), invocation);
            // isOneway 为 true,表示“单向”通信
            boolean isOneway = RpcUtils.isOneway(getUrl(), invocation);
            int timeout = getUrl().getMethodParameter(methodName, Constants.TIMEOUT_KEY, Constants.DEFAULT_TIMEOUT);

            // 异步无返回值
            if (isOneway) {
                boolean isSent = getUrl().getMethodParameter(methodName, Constants.SENT_KEY, false);
                // 发送请求
                currentClient.send(inv, isSent);
                // 设置上下文中的 future 字段为 null
                RpcContext.getContext().setFuture(null);
                // 返回一个空的 RpcResult
                return new RpcResult();
            }

            // 异步有返回值
            else if (isAsync) {
                // 发送请求,并得到一个 ResponseFuture 实例
                ResponseFuture future = currentClient.request(inv, timeout);
                // 设置 future 到上下文中
                RpcContext.getContext().setFuture(new FutureAdapter<Object>(future));
                // 暂时返回一个空结果
                return new RpcResult();
            }

            // 同步调用
            else {
                RpcContext.getContext().setFuture(null);
                // 发送请求,得到一个 ResponseFuture 实例,并调用该实例的 get 方法进行等待
                return (Result) currentClient.request(inv, timeout).get();
            }
        } catch (TimeoutException e) {
            throw new RpcException(..., "Invoke remote method timeout....");
        } catch (RemotingException e) {
            throw new RpcException(..., "Failed to invoke remote method: ...");
        }
    }

    // 省略其他方法
}
上面的代码包含了 Dubbo 对同步和异步调用的处理逻辑,搞懂了上面的代码,会对 Dubbo 的同步和异步调用方式有更深入的了解。Dubbo 实现同步和异步调用比较关键的一点就在于由谁调用 ResponseFuture 的 get 方法。同步调用模式下,由框架自身调用 ResponseFuture 的 get 方法。异步调用模式下,则由用户调用该方法。ResponseFuture 是一个接口,下面我们来看一下它的默认实现类 DefaultFuture 的源码。
public class DefaultFuture implements ResponseFuture {

    private static final Map<Long, Channel> CHANNELS =
        new ConcurrentHashMap<Long, Channel>();

    private static final Map<Long, DefaultFuture> FUTURES =
        new ConcurrentHashMap<Long, DefaultFuture>();

    private final long id;
    private final Channel channel;
    private final Request request;
    private final int timeout;
    private final Lock lock = new ReentrantLock();
    private final Condition done = lock.newCondition();
    private volatile Response response;

    public DefaultFuture(Channel channel, Request request, int timeout) {
        this.channel = channel;
        this.request = request;

        // 获取请求 id,这个 id 很重要,后面还会见到
        this.id = request.getId();
        this.timeout = timeout > 0 ? timeout : channel.getUrl().getPositiveParameter(Constants.TIMEOUT_KEY, Constants.DEFAULT_TIMEOUT);
        // 存储 <requestId, DefaultFuture> 映射关系到 FUTURES 中
        FUTURES.put(id, this);
        CHANNELS.put(id, channel);
    }

    @Override
    public Object get() throws RemotingException {
        return get(timeout);
    }

    @Override
    public Object get(int timeout) throws RemotingException {
        if (timeout <= 0) {
            timeout = Constants.DEFAULT_TIMEOUT;
        }

        // 检测服务提供方是否成功返回了调用结果
        if (!isDone()) {
            long start = System.currentTimeMillis();
            lock.lock();
            try {
                // 循环检测服务提供方是否成功返回了调用结果
                while (!isDone()) {
                    // 如果调用结果尚未返回,这里等待一段时间
                    done.await(timeout, TimeUnit.MILLISECONDS);
                    // 如果调用结果成功返回,或等待超时,此时跳出 while 循环,执行后续的逻辑
                    if (isDone() || System.currentTimeMillis() - start > timeout) {
                        break;
                    }
                }
            } catch (InterruptedException e) {
                throw new RuntimeException(e);
            } finally {
                lock.unlock();
            }

            // 如果调用结果仍未返回,则抛出超时异常
            if (!isDone()) {
                throw new TimeoutException(sent > 0, channel, getTimeoutMessage(false));
            }
        }

        // 返回调用结果
        return returnFromResponse();
    }

    @Override
    public boolean isDone() {
        // 通过检测 response 字段为空与否,判断是否收到了调用结果
        return response != null;
    }

    private Object returnFromResponse() throws RemotingException {
        Response res = response;
        if (res == null) {
            throw new IllegalStateException("response cannot be null");
        }

        // 如果调用结果的状态为 Response.OK,则表示调用过程正常,服务提供方成功返回了调用结果
        if (res.getStatus() == Response.OK) {
            return res.getResult();
        }

        // 抛出异常
        if (res.getStatus() == Response.CLIENT_TIMEOUT || res.getStatus() == Response.SERVER_TIMEOUT) {
            throw new TimeoutException(res.getStatus() == Response.SERVER_TIMEOUT, channel, res.getErrorMessage());
        }
        throw new RemotingException(channel, res.getErrorMessage());
    }

    // 省略其他方法
}
如上,当服务消费者还未接收到调用结果时,用户线程调用 get 方法会被阻塞住。同步调用模式下,框架获得 DefaultFuture 对象后,会立即调用 get 方法进行等待。而异步模式下则是将该对象封装到 FutureAdapter 实例中,并将 FutureAdapter 实例设置到 RpcContext 中,供用户使用。FutureAdapter 是一个适配器,用于将 Dubbo 中的 ResponseFuture 与 JDK 中的 Future 进行适配。这样当用户线程调用 Future 的 get 方法时,经过 FutureAdapter 适配,最终会调用 ResponseFuture 实现类对象的 get 方法,也就是 DefaultFuture 的 get 方法。
到这里关于 Dubbo 几种调用方式的代码逻辑就分析完了,下面来分析请求数据的发送与接收,以及响应数据的发送与接收过程。
消费方发送请求
本节我们来看一下同步调用模式下,服务消费方是如何发送调用请求的。在深入分析源码前,我们先来看一张图。

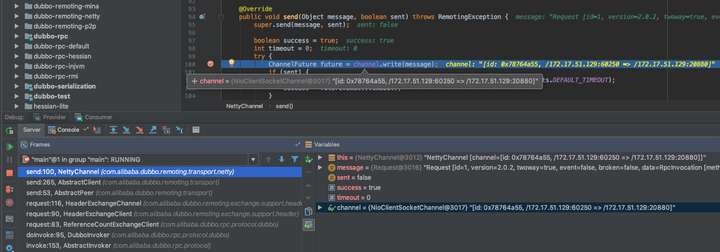
这张图展示了服务消费方发送请求过程的部分调用栈,略为复杂。从上图可以看出,经过多次调用后,才将请求数据送至 Netty NioClientSocketChannel。这样做的原因是通过 Exchange 层为框架引入 Request 和 Response 语义,这一点会在接下来的源码分析过程中会看到。其他的就不多说了,下面开始进行分析。首先分析 ReferenceCountExchangeClient 的源码。
final class ReferenceCountExchangeClient implements ExchangeClient {

    private final URL url;
    private final AtomicInteger referenceCount = new AtomicInteger(0);

    public ReferenceCountExchangeClient(ExchangeClient client, ConcurrentMap<String, LazyConnectExchangeClient> ghostClientMap) {
        this.client = client;
        // 引用计数自增
        referenceCount.incrementAndGet();
        this.url = client.getUrl();

        // ...
    }

    @Override
    public ResponseFuture request(Object request) throws RemotingException {
        // 直接调用被装饰对象的同签名方法
        return client.request(request);
    }

    @Override
    public ResponseFuture request(Object request, int timeout) throws RemotingException {
        // 直接调用被装饰对象的同签名方法
        return client.request(request, timeout);
    }

    /** 引用计数自增,该方法由外部调用 */
    public void incrementAndGetCount() {
        // referenceCount 自增
        referenceCount.incrementAndGet();
    }

        @Override
    public void close(int timeout) {
        // referenceCount 自减
        if (referenceCount.decrementAndGet() <= 0) {
            if (timeout == 0) {
                client.close();
            } else {
                client.close(timeout);
            }
            client = replaceWithLazyClient();
        }
    }

    // 省略部分方法
}
ReferenceCountExchangeClient 内部定义了一个引用计数变量 referenceCount,每当该对象被引用一次 referenceCount 都会进行自增。每当 close 方法被调用时,referenceCount 进行自减。ReferenceCountExchangeClient 内部仅实现了一个引用计数的功能,其他方法并无复杂逻辑,均是直接调用被装饰对象的相关方法。所以这里就不多说了,继续向下分析,这次是 HeaderExchangeClient。
public class HeaderExchangeClient implements ExchangeClient {

    private static final ScheduledThreadPoolExecutor scheduled = new ScheduledThreadPoolExecutor(2, new NamedThreadFactory("dubbo-remoting-client-heartbeat", true));
    private final Client client;
    private final ExchangeChannel channel;
    private ScheduledFuture<?> heartbeatTimer;
    private int heartbeat;
    private int heartbeatTimeout;

    public HeaderExchangeClient(Client client, boolean needHeartbeat) {
        if (client == null) {
            throw new IllegalArgumentException("client == null");
        }
        this.client = client;

        // 创建 HeaderExchangeChannel 对象
        this.channel = new HeaderExchangeChannel(client);

        // 以下代码均与心跳检测逻辑有关
        String dubbo = client.getUrl().getParameter(Constants.DUBBO_VERSION_KEY);
        this.heartbeat = client.getUrl().getParameter(Constants.HEARTBEAT_KEY, dubbo != null && dubbo.startsWith("1.0.") ? Constants.DEFAULT_HEARTBEAT : 0);
        this.heartbeatTimeout = client.getUrl().getParameter(Constants.HEARTBEAT_TIMEOUT_KEY, heartbeat * 3);
        if (heartbeatTimeout < heartbeat * 2) {
            throw new IllegalStateException("heartbeatTimeout < heartbeatInterval * 2");
        }
        if (needHeartbeat) {
            // 开启心跳检测定时器
            startHeartbeatTimer();
        }
    }

    @Override
    public ResponseFuture request(Object request) throws RemotingException {
        // 直接 HeaderExchangeChannel 对象的同签名方法
        return channel.request(request);
    }

    @Override
    public ResponseFuture request(Object request, int timeout) throws RemotingException {
        // 直接 HeaderExchangeChannel 对象的同签名方法
        return channel.request(request, timeout);
    }

    @Override
    public void close() {
        doClose();
        channel.close();
    }

    private void doClose() {
        // 停止心跳检测定时器
        stopHeartbeatTimer();
    }

    private void startHeartbeatTimer() {
        stopHeartbeatTimer();
        if (heartbeat > 0) {
            heartbeatTimer = scheduled.scheduleWithFixedDelay(
                    new HeartBeatTask(new HeartBeatTask.ChannelProvider() {
                        @Override
                        public Collection<Channel> getChannels() {
                            return Collections.<Channel>singletonList(HeaderExchangeClient.this);
                        }
                    }, heartbeat, heartbeatTimeout),
                    heartbeat, heartbeat, TimeUnit.MILLISECONDS);
        }
    }

    private void stopHeartbeatTimer() {
        if (heartbeatTimer != null && !heartbeatTimer.isCancelled()) {
            try {
                heartbeatTimer.cancel(true);
                scheduled.purge();
            } catch (Throwable e) {
                if (logger.isWarnEnabled()) {
                    logger.warn(e.getMessage(), e);
                }
            }
        }
        heartbeatTimer = null;
    }

    // 省略部分方法
}
HeaderExchangeClient 中很多方法只有一行代码,即调用 HeaderExchangeChannel 对象的同签名方法。那 HeaderExchangeClient 有什么用处呢?答案是封装了一些关于心跳检测的逻辑。心跳检测并非本文所关注的点,因此就不多说了,继续向下看。
final class HeaderExchangeChannel implements ExchangeChannel {

    private final Channel channel;

    HeaderExchangeChannel(Channel channel) {
        if (channel == null) {
            throw new IllegalArgumentException("channel == null");
        }

        // 这里的 channel 指向的是 NettyClient
        this.channel = channel;
    }

    @Override
    public ResponseFuture request(Object request) throws RemotingException {
        return request(request, channel.getUrl().getPositiveParameter(Constants.TIMEOUT_KEY, Constants.DEFAULT_TIMEOUT));
    }

    @Override
    public ResponseFuture request(Object request, int timeout) throws RemotingException {
        if (closed) {
            throw new RemotingException(..., "Failed to send request ...);
        }
        // 创建 Request 对象
        Request req = new Request();
        req.setVersion(Version.getProtocolVersion());
        // 设置双向通信标志为 true
        req.setTwoWay(true);
        // 这里的 request 变量类型为 RpcInvocation
        req.setData(request);

        // 创建 DefaultFuture 对象
        DefaultFuture future = new DefaultFuture(channel, req, timeout);
        try {
            // 调用 NettyClient 的 send 方法发送请求
            channel.send(req);
        } catch (RemotingException e) {
            future.cancel();
            throw e;
        }
        // 返回 DefaultFuture 对象
        return future;
    }
}
到这里大家终于看到了 Request 语义了,上面的方法首先定义了一个 Request 对象,然后再将该对象传给 NettyClient 的 send 方法,进行后续的调用。需要说明的是,NettyClient 中并未实现 send 方法,该方法继承自父类 AbstractPeer,下面直接分析 AbstractPeer 的代码。
public abstract class AbstractPeer implements Endpoint, ChannelHandler {

    @Override
    public void send(Object message) throws RemotingException {
        // 该方法由 AbstractClient 类实现
        send(message, url.getParameter(Constants.SENT_KEY, false));
    }

    // 省略其他方法
}

public abstract class AbstractClient extends AbstractEndpoint implements Client {

    @Override
    public void send(Object message, boolean sent) throws RemotingException {
        if (send_reconnect && !isConnected()) {
            connect();
        }

        // 获取 Channel,getChannel 是一个抽象方法,具体由子类实现
        Channel channel = getChannel();
        if (channel == null || !channel.isConnected()) {
            throw new RemotingException(this, "message can not send ...");
        }

        // 继续向下调用
        channel.send(message, sent);
    }

    protected abstract Channel getChannel();

    // 省略其他方法
}
默认情况下,Dubbo 使用 Netty 作为底层的通信框架,因此下面我们到 NettyClient 类中看一下 getChannel 方法的实现逻辑。
public class NettyClient extends AbstractClient {

    // 这里的 Channel 全限定名称为 org.jboss.netty.channel.Channel
    private volatile Channel channel;

    @Override
    protected com.alibaba.dubbo.remoting.Channel getChannel() {
        Channel c = channel;
        if (c == null || !c.isConnected())
            return null;
        // 获取一个 NettyChannel 类型对象
        return NettyChannel.getOrAddChannel(c, getUrl(), this);
    }
}

final class NettyChannel extends AbstractChannel {

    private static final ConcurrentMap<org.jboss.netty.channel.Channel, NettyChannel> channelMap =
        new ConcurrentHashMap<org.jboss.netty.channel.Channel, NettyChannel>();

    private final org.jboss.netty.channel.Channel channel;

    /** 私有构造方法 */
    private NettyChannel(org.jboss.netty.channel.Channel channel, URL url, ChannelHandler handler) {
        super(url, handler);
        if (channel == null) {
            throw new IllegalArgumentException("netty channel == null;");
        }
        this.channel = channel;
    }

    static NettyChannel getOrAddChannel(org.jboss.netty.channel.Channel ch, URL url, ChannelHandler handler) {
        if (ch == null) {
            return null;
        }

        // 尝试从集合中获取 NettyChannel 实例
        NettyChannel ret = channelMap.get(ch);
        if (ret == null) {
            // 如果 ret = null,则创建一个新的 NettyChannel 实例
            NettyChannel nc = new NettyChannel(ch, url, handler);
            if (ch.isConnected()) {
                // 将 <Channel, NettyChannel> 键值对存入 channelMap 集合中
                ret = channelMap.putIfAbsent(ch, nc);
            }
            if (ret == null) {
                ret = nc;
            }
        }
        return ret;
    }
}
获取到 NettyChannel 实例后,即可进行后续的调用。下面看一下 NettyChannel 的 send 方法。
public void send(Object message, boolean sent) throws RemotingException {
    super.send(message, sent);

    boolean success = true;
    int timeout = 0;
    try {
        // 发送消息(包含请求和响应消息)
        ChannelFuture future = channel.write(message);

        // sent 的值源于 <dubbo:method sent="true/false" /> 中 sent 的配置值,有两种配置值:
        //   1. true: 等待消息发出,消息发送失败将抛出异常
        //   2. false: 不等待消息发出,将消息放入 IO 队列,即刻返回
        // 默认情况下 sent = false;
        if (sent) {
            timeout = getUrl().getPositiveParameter(Constants.TIMEOUT_KEY, Constants.DEFAULT_TIMEOUT);
            // 等待消息发出,若在规定时间没能发出,success 会被置为 false
            success = future.await(timeout);
        }
        Throwable cause = future.getCause();
        if (cause != null) {
            throw cause;
        }
    } catch (Throwable e) {
        throw new RemotingException(this, "Failed to send message ...");
    }

    // 若 success 为 false,这里抛出异常
    if (!success) {
        throw new RemotingException(this, "Failed to send message ...");
    }
}
经历多次调用,到这里请求数据的发送过程就结束了,过程漫长。为了便于大家阅读代码,这里以 DemoService 为例,将 sayHello 方法的整个调用路径贴出来。
proxy0#sayHello(String)
  —> InvokerInvocationHandler#invoke(Object, Method, Object[])
    —> MockClusterInvoker#invoke(Invocation)
      —> AbstractClusterInvoker#invoke(Invocation)
        —> FailoverClusterInvoker#doInvoke(Invocation, List<Invoker<T>>, LoadBalance)
          —> Filter#invoke(Invoker, Invocation)  // 包含多个 Filter 调用
            —> ListenerInvokerWrapper#invoke(Invocation)
              —> AbstractInvoker#invoke(Invocation)
                —> DubboInvoker#doInvoke(Invocation)
                  —> ReferenceCountExchangeClient#request(Object, int)
                    —> HeaderExchangeClient#request(Object, int)
                      —> HeaderExchangeChannel#request(Object, int)
                        —> AbstractPeer#send(Object)
                          —> AbstractClient#send(Object, boolean)
                            —> NettyChannel#send(Object, boolean)
                              —> NioClientSocketChannel#write(Object)
在 Netty 中,出站数据在发出之前还需要进行编码操作,接下来我们来分析一下请求数据的编码逻辑。
public class ExchangeCodec extends TelnetCodec {

    // 消息头长度
    protected static final int HEADER_LENGTH = 16;
    // 魔数内容
    protected static final short MAGIC = (short) 0xdabb;
    protected static final byte MAGIC_HIGH = Bytes.short2bytes(MAGIC)[0];
    protected static final byte MAGIC_LOW = Bytes.short2bytes(MAGIC)[1];
    protected static final byte FLAG_REQUEST = (byte) 0x80;
    protected static final byte FLAG_TWOWAY = (byte) 0x40;
    protected static final byte FLAG_EVENT = (byte) 0x20;
    protected static final int SERIALIZATION_MASK = 0x1f;
    private static final Logger logger = LoggerFactory.getLogger(ExchangeCodec.class);

    public Short getMagicCode() {
        return MAGIC;
    }

    @Override
    public void encode(Channel channel, ChannelBuffer buffer, Object msg) throws IOException {
        if (msg instanceof Request) {
            // 对 Request 对象进行编码
            encodeRequest(channel, buffer, (Request) msg);
        } else if (msg instanceof Response) {
            // 对 Response 对象进行编码,后面分析
            encodeResponse(channel, buffer, (Response) msg);
        } else {
            super.encode(channel, buffer, msg);
        }
    }

    protected void encodeRequest(Channel channel, ChannelBuffer buffer, Request req) throws IOException {
        Serialization serialization = getSerialization(channel);

        // 创建消息头字节数组,长度为 16
        byte[] header = new byte[HEADER_LENGTH];

        // 设置魔数
        Bytes.short2bytes(MAGIC, header);

        // 设置数据包类型(Request/Response)和序列化器编号
        header[2] = (byte) (FLAG_REQUEST | serialization.getContentTypeId());

        // 设置通信方式(单向/双向)
        if (req.isTwoWay()) {
            header[2] |= FLAG_TWOWAY;
        }

        // 设置事件标识
        if (req.isEvent()) {
            header[2] |= FLAG_EVENT;
        }

        // 设置请求编号,8个字节,从第4个字节开始设置
        Bytes.long2bytes(req.getId(), header, 4);

        // 获取 buffer 当前的写位置
        int savedWriteIndex = buffer.writerIndex();
        // 更新 writerIndex,为消息头预留 16 个字节的空间
        buffer.writerIndex(savedWriteIndex + HEADER_LENGTH);
        ChannelBufferOutputStream bos = new ChannelBufferOutputStream(buffer);
        // 创建序列化器,比如 Hessian2ObjectOutput
        ObjectOutput out = serialization.serialize(channel.getUrl(), bos);
        if (req.isEvent()) {
            // 对事件数据进行序列化操作
            encodeEventData(channel, out, req.getData());
        } else {
            // 对请求数据进行序列化操作
            encodeRequestData(channel, out, req.getData(), req.getVersion());
        }
        out.flushBuffer();
        if (out instanceof Cleanable) {
            ((Cleanable) out).cleanup();
        }
        bos.flush();
        bos.close();

        // 获取写入的字节数,也就是消息体长度
        int len = bos.writtenBytes();
        checkPayload(channel, len);

        // 将消息体长度写入到消息头中
        Bytes.int2bytes(len, header, 12);

        // 将 buffer 指针移动到 savedWriteIndex,为写消息头做准备
        buffer.writerIndex(savedWriteIndex);
        // 从 savedWriteIndex 下标处写入消息头
        buffer.writeBytes(header);
        // 设置新的 writerIndex,writerIndex = 原写下标 + 消息头长度 + 消息体长度
        buffer.writerIndex(savedWriteIndex + HEADER_LENGTH + len);
    }

    // 省略其他方法
}
以上就是请求对象的编码过程,该过程首先会通过位运算将消息头写入到 header 数组中。然后对 Request 对象的 data 字段执行序列化操作,序列化后的数据最终会存储到 ChannelBuffer 中。序列化操作执行完后,可得到数据序列化后的长度 len,紧接着将 len 写入到 header 指定位置处。最后再将消息头字节数组 header 写入到 ChannelBuffer 中,整个编码过程就结束了。本节的最后,我们再来看一下 Request 对象的 data 字段序列化过程,也就是 encodeRequestData 方法的逻辑,如下:
public class DubboCodec extends ExchangeCodec implements Codec2 {

    protected void encodeRequestData(Channel channel, ObjectOutput out, Object data, String version) throws IOException {
        RpcInvocation inv = (RpcInvocation) data;

        // 依次序列化 dubbo version、path、version
        out.writeUTF(version);
        out.writeUTF(inv.getAttachment(Constants.PATH_KEY));
        out.writeUTF(inv.getAttachment(Constants.VERSION_KEY));

        // 序列化调用方法名
        out.writeUTF(inv.getMethodName());
        // 将参数类型转换为字符串,并进行序列化
        out.writeUTF(ReflectUtils.getDesc(inv.getParameterTypes()));
        Object[] args = inv.getArguments();
        if (args != null)
            for (int i = 0; i < args.length; i++) {
                // 对运行时参数进行序列化
                out.writeObject(encodeInvocationArgument(channel, inv, i));
            }

        // 序列化 attachments
        out.writeObject(inv.getAttachments());
    }
}
至此,关于服务消费方发送请求的过程就分析完了,接下来我们来看一下服务提供方是如何接收请求的。
提供方接收请求
前面说过,默认情况下 Dubbo 使用 Netty 作为底层的通信框架。Netty 检测到有数据入站后,首先会通过解码器对数据进行解码,并将解码后的数据传递给下一个入站处理器的指定方法。所以在进行后续的分析之前,我们先来看一下数据解码过程。
这里直接分析请求数据的解码逻辑,忽略中间过程,如下:
public class ExchangeCodec extends TelnetCodec {

    @Override
    public Object decode(Channel channel, ChannelBuffer buffer) throws IOException {
        int readable = buffer.readableBytes();
        // 创建消息头字节数组
        byte[] header = new byte[Math.min(readable, HEADER_LENGTH)];
        // 读取消息头数据
        buffer.readBytes(header);
        // 调用重载方法进行后续解码工作
        return decode(channel, buffer, readable, header);
    }

    @Override
    protected Object decode(Channel channel, ChannelBuffer buffer, int readable, byte[] header) throws IOException {
        // 检查魔数是否相等
        if (readable > 0 && header[0] != MAGIC_HIGH
                || readable > 1 && header[1] != MAGIC_LOW) {
            int length = header.length;
            if (header.length < readable) {
                header = Bytes.copyOf(header, readable);
                buffer.readBytes(header, length, readable - length);
            }
            for (int i = 1; i < header.length - 1; i++) {
                if (header[i] == MAGIC_HIGH && header[i + 1] == MAGIC_LOW) {
                    buffer.readerIndex(buffer.readerIndex() - header.length + i);
                    header = Bytes.copyOf(header, i);
                    break;
                }
            }
            // 通过 telnet 命令行发送的数据包不包含消息头,所以这里
            // 调用 TelnetCodec 的 decode 方法对数据包进行解码
            return super.decode(channel, buffer, readable, header);
        }

        // 检测可读数据量是否少于消息头长度,若小于则立即返回 DecodeResult.NEED_MORE_INPUT
        if (readable < HEADER_LENGTH) {
            return DecodeResult.NEED_MORE_INPUT;
        }

        // 从消息头中获取消息体长度
        int len = Bytes.bytes2int(header, 12);
        // 检测消息体长度是否超出限制,超出则抛出异常
        checkPayload(channel, len);

        int tt = len + HEADER_LENGTH;
        // 检测可读的字节数是否小于实际的字节数
        if (readable < tt) {
            return DecodeResult.NEED_MORE_INPUT;
        }

        ChannelBufferInputStream is = new ChannelBufferInputStream(buffer, len);

        try {
            // 继续进行解码工作
            return decodeBody(channel, is, header);
        } finally {
            if (is.available() > 0) {
                try {
                    StreamUtils.skipUnusedStream(is);
                } catch (IOException e) {
                    logger.warn(e.getMessage(), e);
                }
            }
        }
    }
}
上面方法通过检测消息头中的魔数是否与规定的魔数相等,提前拦截掉非常规数据包,比如通过 telnet 命令行发出的数据包。接着再对消息体长度,以及可读字节数进行检测。最后调用 decodeBody 方法进行后续的解码工作,ExchangeCodec 中实现了 decodeBody 方法,但因其子类 DubboCodec 覆写了该方法,所以在运行时 DubboCodec 中的 decodeBody 方法会被调用。下面我们来看一下该方法的代码。
public class DubboCodec extends ExchangeCodec implements Codec2 {

    @Override
    protected Object decodeBody(Channel channel, InputStream is, byte[] header) throws IOException {
        // 获取消息头中的第三个字节,并通过逻辑与运算得到序列化器编号
        byte flag = header[2], proto = (byte) (flag & SERIALIZATION_MASK);
        Serialization s = CodecSupport.getSerialization(channel.getUrl(), proto);
        // 获取调用编号
        long id = Bytes.bytes2long(header, 4);
        // 通过逻辑与运算得到调用类型,0 - Response,1 - Request
        if ((flag & FLAG_REQUEST) == 0) {
            // 对响应结果进行解码,得到 Response 对象。这个非本节内容,后面再分析
            // ...
        } else {
            // 创建 Request 对象
            Request req = new Request(id);
            req.setVersion(Version.getProtocolVersion());
            // 通过逻辑与运算得到通信方式,并设置到 Request 对象中
            req.setTwoWay((flag & FLAG_TWOWAY) != 0);

            // 通过位运算检测数据包是否为事件类型
            if ((flag & FLAG_EVENT) != 0) {
                // 设置心跳事件到 Request 对象中
                req.setEvent(Request.HEARTBEAT_EVENT);
            }
            try {
                Object data;
                if (req.isHeartbeat()) {
                    // 对心跳包进行解码,该方法已被标注为废弃
                    data = decodeHeartbeatData(channel, deserialize(s, channel.getUrl(), is));
                } else if (req.isEvent()) {
                    // 对事件数据进行解码
                    data = decodeEventData(channel, deserialize(s, channel.getUrl(), is));
                } else {
                    DecodeableRpcInvocation inv;
                    // 根据 url 参数判断是否在 IO 线程上对消息体进行解码
                    if (channel.getUrl().getParameter(
                            Constants.DECODE_IN_IO_THREAD_KEY,
                            Constants.DEFAULT_DECODE_IN_IO_THREAD)) {
                        inv = new DecodeableRpcInvocation(channel, req, is, proto);
                        // 在当前线程,也就是 IO 线程上进行后续的解码工作。此工作完成后,可将
                        // 调用方法名、attachment、以及调用参数解析出来
                        inv.decode();
                    } else {
                        // 仅创建 DecodeableRpcInvocation 对象,但不在当前线程上执行解码逻辑
                        inv = new DecodeableRpcInvocation(channel, req,
                                new UnsafeByteArrayInputStream(readMessageData(is)), proto);
                    }
                    data = inv;
                }

                // 设置 data 到 Request 对象中
                req.setData(data);
            } catch (Throwable t) {
                // 若解码过程中出现异常,则将 broken 字段设为 true,
                // 并将异常对象设置到 Reqeust 对象中
                req.setBroken(true);
                req.setData(t);
            }
            return req;
        }
    }
}
如上,decodeBody 对部分字段进行了解码,并将解码得到的字段封装到 Request 中。随后会调用 DecodeableRpcInvocation 的 decode 方法进行后续的解码工作。此工作完成后,可将调用方法名、attachment、以及调用参数解析出来。下面我们来看一下 DecodeableRpcInvocation 的 decode 方法逻辑。
public class DecodeableRpcInvocation extends RpcInvocation implements Codec, Decodeable {

    @Override
    public Object decode(Channel channel, InputStream input) throws IOException {
        ObjectInput in = CodecSupport.getSerialization(channel.getUrl(), serializationType)
                .deserialize(channel.getUrl(), input);

        // 通过反序列化得到 dubbo version,并保存到 attachments 变量中
        String dubboVersion = in.readUTF();
        request.setVersion(dubboVersion);
        setAttachment(Constants.DUBBO_VERSION_KEY, dubboVersion);

        // 通过反序列化得到 path,version,并保存到 attachments 变量中
        setAttachment(Constants.PATH_KEY, in.readUTF());
        setAttachment(Constants.VERSION_KEY, in.readUTF());

        // 通过反序列化得到调用方法名
        setMethodName(in.readUTF());
        try {
            Object[] args;
            Class<?>[] pts;
            // 通过反序列化得到参数类型字符串,比如 Ljava/lang/String;
            String desc = in.readUTF();
            if (desc.length() == 0) {
                pts = DubboCodec.EMPTY_CLASS_ARRAY;
                args = DubboCodec.EMPTY_OBJECT_ARRAY;
            } else {
                // 将 desc 解析为参数类型数组
                pts = ReflectUtils.desc2classArray(desc);
                args = new Object[pts.length];
                for (int i = 0; i < args.length; i++) {
                    try {
                        // 解析运行时参数
                        args[i] = in.readObject(pts[i]);
                    } catch (Exception e) {
                        if (log.isWarnEnabled()) {
                            log.warn("Decode argument failed: " + e.getMessage(), e);
                        }
                    }
                }
            }

            // 设置参数类型数组
            setParameterTypes(pts);

            // 通过反序列化得到原 attachment 的内容
            Map<String, String> map = (Map<String, String>) in.readObject(Map.class);
            if (map != null && map.size() > 0) {
                Map<String, String> attachment = getAttachments();
                if (attachment == null) {
                    attachment = new HashMap<String, String>();
                }
                // 将 map 与当前对象中的 attachment 集合进行融合
                attachment.putAll(map);
                setAttachments(attachment);
            }

            // 对 callback 类型的参数进行处理
            for (int i = 0; i < args.length; i++) {
                args[i] = decodeInvocationArgument(channel, this, pts, i, args[i]);
            }

            // 设置参数列表
            setArguments(args);

        } catch (ClassNotFoundException e) {
            throw new IOException(StringUtils.toString("Read invocation data failed.", e));
        } finally {
            if (in instanceof Cleanable) {
                ((Cleanable) in).cleanup();
            }
        }
        return this;
    }
}
上面的方法通过反序列化将诸如 path、version、调用方法名、参数列表等信息依次解析出来,并设置到相应的字段中,最终得到一个具有完整调用信息的 DecodeableRpcInvocation 对象。
到这里,请求数据解码的过程就分析完了。此时我们得到了一个 Request 对象,这个对象会被传送到下一个入站处理器中,我们继续往下看。
解码器将数据包解析成 Request 对象后,NettyHandler 的 messageReceived 方法紧接着会收到这个对象,并将这个对象继续向下传递。这期间该对象会被依次传递给 NettyServer、MultiMessageHandler、HeartbeatHandler 以及 AllChannelHandler。最后由 AllChannelHandler 将该对象封装到 Runnable 实现类对象中,并将 Runnable 放入线程池中执行后续的调用逻辑。整个调用栈如下:
NettyHandler#messageReceived(ChannelHandlerContext, MessageEvent)
  —> AbstractPeer#received(Channel, Object)
    —> MultiMessageHandler#received(Channel, Object)
      —> HeartbeatHandler#received(Channel, Object)
        —> AllChannelHandler#received(Channel, Object)
          —> ExecutorService#execute(Runnable)    // 由线程池执行后续的调用逻辑
这里我们直接分析调用栈中的分析第一个和最后一个调用方法逻辑。如下:
@Sharable
public class NettyHandler extends SimpleChannelHandler {

    private final Map<String, Channel> channels = new ConcurrentHashMap<String, Channel>();

    private final URL url;

    private final ChannelHandler handler;

    public NettyHandler(URL url, ChannelHandler handler) {
        if (url == null) {
            throw new IllegalArgumentException("url == null");
        }
        if (handler == null) {
            throw new IllegalArgumentException("handler == null");
        }
        this.url = url;

        // 这里的 handler 类型为 NettyServer
        this.handler = handler;
    }

    public void messageReceived(ChannelHandlerContext ctx, MessageEvent e) throws Exception {
        // 获取 NettyChannel
        NettyChannel channel = NettyChannel.getOrAddChannel(ctx.getChannel(), url, handler);
        try {
            // 继续向下调用
            handler.received(channel, e.getMessage());
        } finally {
            NettyChannel.removeChannelIfDisconnected(ctx.getChannel());
        }
    }
}
如上,NettyHandler 中的 messageReceived 逻辑比较简单。首先根据一些信息获取 NettyChannel 实例,然后将 NettyChannel 实例以及 Request 对象向下传递。下面再来看看 AllChannelHandler 的逻辑,在详细分析代码之前,我们先来了解一下 Dubbo 中的线程派发模型。
Dubbo 将底层通信框架中接收请求的线程称为 IO 线程。如果一些事件处理逻辑可以很快执行完,比如只在内存打一个标记,此时直接在 IO 线程上执行该段逻辑即可。但如果事件的处理逻辑比较耗时,比如该段逻辑会发起数据库查询或者 HTTP 请求。此时我们就不应该让事件处理逻辑在 IO 线程上执行,而是应该派发到线程池中去执行。原因也很简单,IO 线程主要用于接收请求,如果 IO 线程被占满,将导致它不能接收新的请求。

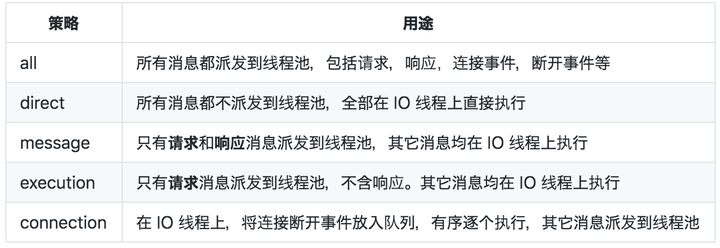
如上图,Dispatcher 就是线程派发器。需要说明的是,Dispatcher 真实的职责创建具有线程派发能力的 ChannelHandler,比如 AllChannelHandler、MessageOnlyChannelHandler 和 ExecutionChannelHandler 等,其本身并不具备线程派发能力。Dubbo 支持 5 种不同的线程派发策略,下面通过一个表格列举一下。

默认配置下,Dubbo 使用 all 派发策略,即将所有的消息都派发到线程池中。下面我们来分析一下 AllChannelHandler 的代码。
public class AllChannelHandler extends WrappedChannelHandler {

    public AllChannelHandler(ChannelHandler handler, URL url) {
        super(handler, url);
    }

    /** 处理连接事件 */
    @Override
    public void connected(Channel channel) throws RemotingException {
        // 获取线程池
        ExecutorService cexecutor = getExecutorService();
        try {
            // 将连接事件派发到线程池中处理
            cexecutor.execute(new ChannelEventRunnable(channel, handler, ChannelState.CONNECTED));
        } catch (Throwable t) {
            throw new ExecutionException(..., " error when process connected event .", t);
        }
    }

    /** 处理断开事件 */
    @Override
    public void disconnected(Channel channel) throws RemotingException {
        ExecutorService cexecutor = getExecutorService();
        try {
            cexecutor.execute(new ChannelEventRunnable(channel, handler, ChannelState.DISCONNECTED));
        } catch (Throwable t) {
            throw new ExecutionException(..., "error when process disconnected event .", t);
        }
    }

    /** 处理请求和响应消息,这里的 message 变量类型可能是 Request,也可能是 Response */
    @Override
    public void received(Channel channel, Object message) throws RemotingException {
        ExecutorService cexecutor = getExecutorService();
        try {
            // 将请求和响应消息派发到线程池中处理
            cexecutor.execute(new ChannelEventRunnable(channel, handler, ChannelState.RECEIVED, message));
        } catch (Throwable t) {
            if(message instanceof Request && t instanceof RejectedExecutionException){
                Request request = (Request)message;
                // 如果通信方式为双向通信,此时将 Server side ... threadpool is exhausted
                // 错误信息封装到 Response 中,并返回给服务消费方。
                if(request.isTwoWay()){
                    String msg = "Server side(" + url.getIp() + "," + url.getPort()
                        + ") threadpool is exhausted ,detail msg:" + t.getMessage();
                    Response response = new Response(request.getId(), request.getVersion());
                    response.setStatus(Response.SERVER_THREADPOOL_EXHAUSTED_ERROR);
                    response.setErrorMessage(msg);
                    // 返回包含错误信息的 Response 对象
                    channel.send(response);
                    return;
                }
            }
            throw new ExecutionException(..., " error when process received event .", t);
        }
    }

    /** 处理异常信息 */
    @Override
    public void caught(Channel channel, Throwable exception) throws RemotingException {
        ExecutorService cexecutor = getExecutorService();
        try {
            cexecutor.execute(new ChannelEventRunnable(channel, handler, ChannelState.CAUGHT, exception));
        } catch (Throwable t) {
            throw new ExecutionException(..., "error when process caught event ...");
        }
    }
}
如上,请求对象会被封装 ChannelEventRunnable 中,ChannelEventRunnable 将会是服务调用过程的新起点。所以接下来我们以 ChannelEventRunnable 为起点向下探索。
public class ChannelEventRunnable implements Runnable {

    private final ChannelHandler handler;
    private final Channel channel;
    private final ChannelState state;
    private final Throwable exception;
    private final Object message;

    @Override
    public void run() {
        // 检测通道状态,对于请求或响应消息,此时 state = RECEIVED
        if (state == ChannelState.RECEIVED) {
            try {
                // 将 channel 和 message 传给 ChannelHandler 对象,进行后续的调用
                handler.received(channel, message);
            } catch (Exception e) {
                logger.warn("... operation error, channel is ... message is ...");
            }
        }

        // 其他消息类型通过 switch 进行处理
        else {
            switch (state) {
            case CONNECTED:
                try {
                    handler.connected(channel);
                } catch (Exception e) {
                    logger.warn("... operation error, channel is ...");
                }
                break;
            case DISCONNECTED:
                // ...
            case SENT:
                // ...
            case CAUGHT:
                // ...
            default:
                logger.warn("unknown state: " + state + ", message is " + message);
            }
        }

    }
}
如上,请求和响应消息出现频率明显比其他类型消息高,所以这里对该类型的消息进行了针对性判断。ChannelEventRunnable 仅是一个中转站,它的 run 方法中并不包含具体的调用逻辑,仅用于将参数传给其他 ChannelHandler 对象进行处理,该对象类型为 DecodeHandler。
public class DecodeHandler extends AbstractChannelHandlerDelegate {

    public DecodeHandler(ChannelHandler handler) {
        super(handler);
    }

    @Override
    public void received(Channel channel, Object message) throws RemotingException {
        if (message instanceof Decodeable) {
            // 对 Decodeable 接口实现类对象进行解码
            decode(message);
        }

        if (message instanceof Request) {
            // 对 Request 的 data 字段进行解码
            decode(((Request) message).getData());
        }

        if (message instanceof Response) {
            // 对 Request 的 result 字段进行解码
            decode(((Response) message).getResult());
        }

        // 执行后续逻辑
        handler.received(channel, message);
    }

    private void decode(Object message) {
        // Decodeable 接口目前有两个实现类,
        // 分别为 DecodeableRpcInvocation 和 DecodeableRpcResult
        if (message != null && message instanceof Decodeable) {
            try {
                // 执行解码逻辑
                ((Decodeable) message).decode();
            } catch (Throwable e) {
                if (log.isWarnEnabled()) {
                    log.warn("Call Decodeable.decode failed: " + e.getMessage(), e);
                }
            }
        }
    }
}
DecodeHandler 主要是包含了一些解码逻辑。前面分析请求解码时说过,请求解码可在 IO 线程上执行,也可在线程池中执行,这个取决于运行时配置。DecodeHandler 存在的意义就是保证请求或响应对象可在线程池中被解码。解码完毕后,完全解码后的 Request 对象会继续向后传递,下一站是 HeaderExchangeHandler。
public class HeaderExchangeHandler implements ChannelHandlerDelegate {

    private final ExchangeHandler handler;

    public HeaderExchangeHandler(ExchangeHandler handler) {
        if (handler == null) {
            throw new IllegalArgumentException("handler == null");
        }
        this.handler = handler;
    }

    @Override
    public void received(Channel channel, Object message) throws RemotingException {
        channel.setAttribute(KEY_READ_TIMESTAMP, System.currentTimeMillis());
        ExchangeChannel exchangeChannel = HeaderExchangeChannel.getOrAddChannel(channel);
        try {
            // 处理请求对象
            if (message instanceof Request) {
                Request request = (Request) message;
                if (request.isEvent()) {
                    // 处理事件
                    handlerEvent(channel, request);
                }
                // 处理普通的请求
                else {
                    // 双向通信
                    if (request.isTwoWay()) {
                        // 向后调用服务,并得到调用结果
                        Response response = handleRequest(exchangeChannel, request);
                        // 将调用结果返回给服务消费端
                        channel.send(response);
                    }
                    // 如果是单向通信,仅向后调用指定服务即可,无需返回调用结果
                    else {
                        handler.received(exchangeChannel, request.getData());
                    }
                }
            }
            // 处理响应对象,服务消费方会执行此处逻辑,后面分析
            else if (message instanceof Response) {
                handleResponse(channel, (Response) message);
            } else if (message instanceof String) {
                // telnet 相关,忽略
            } else {
                handler.received(exchangeChannel, message);
            }
        } finally {
            HeaderExchangeChannel.removeChannelIfDisconnected(channel);
        }
    }

    Response handleRequest(ExchangeChannel channel, Request req) throws RemotingException {
        Response res = new Response(req.getId(), req.getVersion());
        // 检测请求是否合法,不合法则返回状态码为 BAD_REQUEST 的响应
        if (req.isBroken()) {
            Object data = req.getData();

            String msg;
            if (data == null)
                msg = null;
            else if
                (data instanceof Throwable) msg = StringUtils.toString((Throwable) data);
            else
                msg = data.toString();
            res.setErrorMessage("Fail to decode request due to: " + msg);
            // 设置 BAD_REQUEST 状态
            res.setStatus(Response.BAD_REQUEST);

            return res;
        }

        // 获取 data 字段值,也就是 RpcInvocation 对象
        Object msg = req.getData();
        try {
            // 继续向下调用
            Object result = handler.reply(channel, msg);
            // 设置 OK 状态码
            res.setStatus(Response.OK);
            // 设置调用结果
            res.setResult(result);
        } catch (Throwable e) {
            // 若调用过程出现异常,则设置 SERVICE_ERROR,表示服务端异常
            res.setStatus(Response.SERVICE_ERROR);
            res.setErrorMessage(StringUtils.toString(e));
        }
        return res;
    }
}
到这里,我们看到了比较清晰的请求和响应逻辑。对于双向通信,HeaderExchangeHandler 首先向后进行调用,得到调用结果。然后将调用结果封装到 Response 对象中,最后再将该对象返回给服务消费方。如果请求不合法,或者调用失败,则将错误信息封装到 Response 对象中,并返回给服务消费方。接下来我们继续向后分析,把剩余的调用过程分析完。下面分析定义在 DubboProtocol 类中的匿名类对象逻辑,如下:
public class DubboProtocol extends AbstractProtocol {

    public static final String NAME = "dubbo";

    private ExchangeHandler requestHandler = new ExchangeHandlerAdapter() {

        @Override
        public Object reply(ExchangeChannel channel, Object message) throws RemotingException {
            if (message instanceof Invocation) {
                Invocation inv = (Invocation) message;
                // 获取 Invoker 实例
                Invoker<?> invoker = getInvoker(channel, inv);
                if (Boolean.TRUE.toString().equals(inv.getAttachments().get(IS_CALLBACK_SERVICE_INVOKE))) {
                    // 回调相关,忽略
                }
                RpcContext.getContext().setRemoteAddress(channel.getRemoteAddress());
                // 通过 Invoker 调用具体的服务
                return invoker.invoke(inv);
            }
            throw new RemotingException(channel, "Unsupported request: ...");
        }

        // 忽略其他方法
    }

    Invoker<?> getInvoker(Channel channel, Invocation inv) throws RemotingException {
        // 忽略回调和本地存根相关逻辑
        // ...

        int port = channel.getLocalAddress().getPort();

        // 计算 service key,格式为 groupName/serviceName:serviceVersion:port。比如:
        //   dubbo/com.alibaba.dubbo.demo.DemoService:1.0.0:20880
        String serviceKey = serviceKey(port, path, inv.getAttachments().get(Constants.VERSION_KEY), inv.getAttachments().get(Constants.GROUP_KEY));

        // 从 exporterMap 查找与 serviceKey 相对应的 DubboExporter 对象,
        // 服务导出过程中会将 <serviceKey, DubboExporter> 映射关系存储到 exporterMap 集合中
        DubboExporter<?> exporter = (DubboExporter<?>) exporterMap.get(serviceKey);

        if (exporter == null)
            throw new RemotingException(channel, "Not found exported service ...");

        // 获取 Invoker 对象,并返回
        return exporter.getInvoker();
    }

    // 忽略其他方法
}
以上逻辑用于获取与指定服务对应的 Invoker 实例,并通过 Invoker 的 invoke 方法调用服务逻辑。invoke 方法定义在 AbstractProxyInvoker 中,代码如下。
public abstract class AbstractProxyInvoker<T> implements Invoker<T> {

    @Override
    public Result invoke(Invocation invocation) throws RpcException {
        try {
            // 调用 doInvoke 执行后续的调用,并将调用结果封装到 RpcResult 中,并
            return new RpcResult(doInvoke(proxy, invocation.getMethodName(), invocation.getParameterTypes(), invocation.getArguments()));
        } catch (InvocationTargetException e) {
            return new RpcResult(e.getTargetException());
        } catch (Throwable e) {
            throw new RpcException("Failed to invoke remote proxy method ...");
        }
    }

    protected abstract Object doInvoke(T proxy, String methodName, Class<?>[] parameterTypes, Object[] arguments) throws Throwable;
}
如上,doInvoke 是一个抽象方法,这个需要由具体的 Invoker 实例实现。Invoker 实例是在运行时通过 JavassistProxyFactory 创建的,创建逻辑如下:
public class JavassistProxyFactory extends AbstractProxyFactory {

    // 省略其他方法

    @Override
    public <T> Invoker<T> getInvoker(T proxy, Class<T> type, URL url) {
        final Wrapper wrapper = Wrapper.getWrapper(proxy.getClass().getName().indexOf('$') < 0 ? proxy.getClass() : type);
        // 创建匿名类对象
        return new AbstractProxyInvoker<T>(proxy, type, url) {
            @Override
            protected Object doInvoke(T proxy, String methodName,
                                      Class<?>[] parameterTypes,
                                      Object[] arguments) throws Throwable {
                // 调用 invokeMethod 方法进行后续的调用
                return wrapper.invokeMethod(proxy, methodName, parameterTypes, arguments);
            }
        };
    }
}
Wrapper 是一个抽象类,其中 invokeMethod 是一个抽象方法。Dubbo 会在运行时通过 Javassist 框架为 Wrapper 生成实现类,并实现 invokeMethod 方法,该方法最终会根据调用信息调用具体的服务。以 DemoServiceImpl 为例,Javassist 为其生成的代理类如下。
/** Wrapper0 是在运行时生成的,大家可使用 Arthas 进行反编译 */
public class Wrapper0 extends Wrapper implements ClassGenerator.DC {
    public static String[] pns;
    public static Map pts;
    public static String[] mns;
    public static String[] dmns;
    public static Class[] mts0;

    // 省略其他方法

    public Object invokeMethod(Object object, String string, Class[] arrclass, Object[] arrobject) throws InvocationTargetException {
        DemoService demoService;
        try {
            // 类型转换
            demoService = (DemoService)object;
        }
        catch (Throwable throwable) {
            throw new IllegalArgumentException(throwable);
        }
        try {
            // 根据方法名调用指定的方法
            if ("sayHello".equals(string) && arrclass.length == 1) {
                return demoService.sayHello((String)arrobject[0]);
            }
        }
        catch (Throwable throwable) {
            throw new InvocationTargetException(throwable);
        }
        throw new NoSuchMethodException(new StringBuffer().append("Not found method \"").append(string).append("\" in class com.alibaba.dubbo.demo.DemoService.").toString());
    }
}
到这里,整个服务调用过程就分析完了。最后把调用过程贴出来,如下:
ChannelEventRunnable#run()
  —> DecodeHandler#received(Channel, Object)
    —> HeaderExchangeHandler#received(Channel, Object)
      —> HeaderExchangeHandler#handleRequest(ExchangeChannel, Request)
        —> DubboProtocol.requestHandler#reply(ExchangeChannel, Object)
          —> Filter#invoke(Invoker, Invocation)
            —> AbstractProxyInvoker#invoke(Invocation)
              —> Wrapper0#invokeMethod(Object, String, Class[], Object[])
                —> DemoServiceImpl#sayHello(String)
返回调用结果
服务提供方调用指定服务后,会将调用结果封装到 Response 对象中,并将该对象返回给服务消费方。服务提供方也是通过 NettyChannel 的 send 方法将 Response 对象返回。本节我们仅需关注 Response 对象的编码过程即可,这里仍然省略一些中间调用,直接分析具体的编码逻辑。
public class ExchangeCodec extends TelnetCodec {
    public void encode(Channel channel, ChannelBuffer buffer, Object msg) throws IOException {
        if (msg instanceof Request) {
            encodeRequest(channel, buffer, (Request) msg);
        } else if (msg instanceof Response) {
            // 对响应对象进行编码
            encodeResponse(channel, buffer, (Response) msg);
        } else {
            super.encode(channel, buffer, msg);
        }
    }

    protected void encodeResponse(Channel channel, ChannelBuffer buffer, Response res) throws IOException {
        int savedWriteIndex = buffer.writerIndex();
        try {
            Serialization serialization = getSerialization(channel);
            // 创建消息头字节数组
            byte[] header = new byte[HEADER_LENGTH];
            // 设置魔数
            Bytes.short2bytes(MAGIC, header);
            // 设置序列化器编号
            header[2] = serialization.getContentTypeId();
            if (res.isHeartbeat()) header[2] |= FLAG_EVENT;
            // 获取响应状态
            byte status = res.getStatus();
            // 设置响应状态
            header[3] = status;
            // 设置请求编号
            Bytes.long2bytes(res.getId(), header, 4);

            // 更新 writerIndex,为消息头预留 16 个字节的空间
            buffer.writerIndex(savedWriteIndex + HEADER_LENGTH);
            ChannelBufferOutputStream bos = new ChannelBufferOutputStream(buffer);
            ObjectOutput out = serialization.serialize(channel.getUrl(), bos);

            if (status == Response.OK) {
                if (res.isHeartbeat()) {
                    // 对心跳响应结果进行序列化,已废弃
                    encodeHeartbeatData(channel, out, res.getResult());
                } else {
                    // 对调用结果进行序列化
                    encodeResponseData(channel, out, res.getResult(), res.getVersion());
                }
            } else {
                // 对错误信息进行序列化
                out.writeUTF(res.getErrorMessage())
            };
            out.flushBuffer();
            if (out instanceof Cleanable) {
                ((Cleanable) out).cleanup();
            }
            bos.flush();
            bos.close();

            // 获取写入的字节数,也就是消息体长度
            int len = bos.writtenBytes();
            checkPayload(channel, len);

            // 将消息体长度写入到消息头中
            Bytes.int2bytes(len, header, 12);
            // 将 buffer 指针移动到 savedWriteIndex,为写消息头做准备
            buffer.writerIndex(savedWriteIndex);
            // 从 savedWriteIndex 下标处写入消息头
            buffer.writeBytes(header);
            // 设置新的 writerIndex,writerIndex = 原写下标 + 消息头长度 + 消息体长度
            buffer.writerIndex(savedWriteIndex + HEADER_LENGTH + len);
        } catch (Throwable t) {
            // 异常处理逻辑不是很难理解,但是代码略多,这里忽略了
        }
    }
}

public class DubboCodec extends ExchangeCodec implements Codec2 {

    protected void encodeResponseData(Channel channel, ObjectOutput out, Object data, String version) throws IOException {
        Result result = (Result) data;
        // 检测当前协议版本是否支持带有 attachment 集合的 Response 对象
        boolean attach = Version.isSupportResponseAttachment(version);
        Throwable th = result.getException();

        // 异常信息为空
        if (th == null) {
            Object ret = result.getValue();
            // 调用结果为空
            if (ret == null) {
                // 序列化响应类型
                out.writeByte(attach ? RESPONSE_NULL_VALUE_WITH_ATTACHMENTS : RESPONSE_NULL_VALUE);
            }
            // 调用结果非空
            else {
                // 序列化响应类型
                out.writeByte(attach ? RESPONSE_VALUE_WITH_ATTACHMENTS : RESPONSE_VALUE);
                // 序列化调用结果
                out.writeObject(ret);
            }
        }
        // 异常信息非空
        else {
            // 序列化响应类型
            out.writeByte(attach ? RESPONSE_WITH_EXCEPTION_WITH_ATTACHMENTS : RESPONSE_WITH_EXCEPTION);
            // 序列化异常对象
            out.writeObject(th);
        }

        if (attach) {
            // 记录 Dubbo 协议版本
            result.getAttachments().put(Constants.DUBBO_VERSION_KEY, Version.getProtocolVersion());
            // 序列化 attachments 集合
            out.writeObject(result.getAttachments());
        }
    }
}
以上就是 Response 对象编码的过程,和前面分析的 Request 对象编码过程很相似。如果大家能看 Request 对象的编码逻辑,那么这里的 Response 对象的编码逻辑也不难理解,就不多说了。接下来我们再来分析双向通信的最后一环 —— 服务消费方接收调用结果。
接收调用结果
服务消费方在收到响应数据后,首先要做的事情是对响应数据进行解码,得到 Response 对象。然后再将该对象传递给下一个入站处理器,这个入站处理器就是 NettyHandler。接下来 NettyHandler 会将这个对象继续向下传递,最后 AllChannelHandler 的 received 方法会收到这个对象,并将这个对象派发到线程池中。这个过程和服务提供方接收请求的过程是一样的,因此这里就不重复分析了。本节我们重点分析两个方面的内容,一是响应数据的解码过程,二是 Dubbo 如何将调用结果传递给用户线程的。下面先来分析响应数据的解码过程。
响应数据解码逻辑主要的逻辑封装在 DubboCodec 中,我们直接分析这个类的代码。如下:
public class DubboCodec extends ExchangeCodec implements Codec2 {

    @Override
    protected Object decodeBody(Channel channel, InputStream is, byte[] header) throws IOException {
        byte flag = header[2], proto = (byte) (flag & SERIALIZATION_MASK);
        Serialization s = CodecSupport.getSerialization(channel.getUrl(), proto);
        // 获取请求编号
        long id = Bytes.bytes2long(header, 4);
        // 检测消息类型,若下面的条件成立,表明消息类型为 Response
        if ((flag & FLAG_REQUEST) == 0) {
            // 创建 Response 对象
            Response res = new Response(id);
            // 检测事件标志位
            if ((flag & FLAG_EVENT) != 0) {
                // 设置心跳事件
                res.setEvent(Response.HEARTBEAT_EVENT);
            }
            // 获取响应状态
            byte status = header[3];
            // 设置响应状态
            res.setStatus(status);

            // 如果响应状态为 OK,表明调用过程正常
            if (status == Response.OK) {
                try {
                    Object data;
                    if (res.isHeartbeat()) {
                        // 反序列化心跳数据,已废弃
                        data = decodeHeartbeatData(channel, deserialize(s, channel.getUrl(), is));
                    } else if (res.isEvent()) {
                        // 反序列化事件数据
                        data = decodeEventData(channel, deserialize(s, channel.getUrl(), is));
                    } else {
                        DecodeableRpcResult result;
                        // 根据 url 参数决定是否在 IO 线程上执行解码逻辑
                        if (channel.getUrl().getParameter(
                                Constants.DECODE_IN_IO_THREAD_KEY,
                                Constants.DEFAULT_DECODE_IN_IO_THREAD)) {
                            // 创建 DecodeableRpcResult 对象
                            result = new DecodeableRpcResult(channel, res, is,
                                    (Invocation) getRequestData(id), proto);
                            // 进行后续的解码工作
                            result.decode();
                        } else {
                            // 创建 DecodeableRpcResult 对象
                            result = new DecodeableRpcResult(channel, res,
                                    new UnsafeByteArrayInputStream(readMessageData(is)),
                                    (Invocation) getRequestData(id), proto);
                        }
                        data = result;
                    }

                    // 设置 DecodeableRpcResult 对象到 Response 对象中
                    res.setResult(data);
                } catch (Throwable t) {
                    // 解码过程中出现了错误,此时设置 CLIENT_ERROR 状态码到 Response 对象中
                    res.setStatus(Response.CLIENT_ERROR);
                    res.setErrorMessage(StringUtils.toString(t));
                }
            }
            // 响应状态非 OK,表明调用过程出现了异常
            else {
                // 反序列化异常信息,并设置到 Response 对象中
                res.setErrorMessage(deserialize(s, channel.getUrl(), is).readUTF());
            }
            return res;
        } else {
            // 对请求数据进行解码,前面已分析过,此处忽略
        }
    }
}
以上就是响应数据的解码过程,上面逻辑看起来是不是似曾相识。对的,我们在前面章节分析过 DubboCodec 的 decodeBody 方法中关于请求数据的解码过程,该过程和响应数据的解码过程很相似。下面,我们继续分析调用结果的反序列化过程,如下:
public class DecodeableRpcResult extends RpcResult implements Codec, Decodeable {

    private Invocation invocation;

    @Override
    public void decode() throws Exception {
        if (!hasDecoded && channel != null && inputStream != null) {
            try {
                // 执行反序列化操作
                decode(channel, inputStream);
            } catch (Throwable e) {
                // 反序列化失败,设置 CLIENT_ERROR 状态到 Response 对象中
                response.setStatus(Response.CLIENT_ERROR);
                // 设置异常信息
                response.setErrorMessage(StringUtils.toString(e));
            } finally {
                hasDecoded = true;
            }
        }
    }

    @Override
    public Object decode(Channel channel, InputStream input) throws IOException {
        ObjectInput in = CodecSupport.getSerialization(channel.getUrl(), serializationType)
                .deserialize(channel.getUrl(), input);

        // 反序列化响应类型
        byte flag = in.readByte();
        switch (flag) {
            case DubboCodec.RESPONSE_NULL_VALUE:
                break;
            case DubboCodec.RESPONSE_VALUE:
                // ...
                break;
            case DubboCodec.RESPONSE_WITH_EXCEPTION:
                // ...
                break;

            // 返回值为空,且携带了 attachments 集合
            case DubboCodec.RESPONSE_NULL_VALUE_WITH_ATTACHMENTS:
                try {
                    // 反序列化 attachments 集合,并存储起来
                    setAttachments((Map<String, String>) in.readObject(Map.class));
                } catch (ClassNotFoundException e) {
                    throw new IOException(StringUtils.toString("Read response data failed.", e));
                }
                break;

            // 返回值不为空,且携带了 attachments 集合
            case DubboCodec.RESPONSE_VALUE_WITH_ATTACHMENTS:
                try {
                    // 获取返回值类型
                    Type[] returnType = RpcUtils.getReturnTypes(invocation);
                    // 反序列化调用结果,并保存起来
                    setValue(returnType == null || returnType.length == 0 ? in.readObject() :
                            (returnType.length == 1 ? in.readObject((Class<?>) returnType[0])
                                    : in.readObject((Class<?>) returnType[0], returnType[1])));
                    // 反序列化 attachments 集合,并存储起来
                    setAttachments((Map<String, String>) in.readObject(Map.class));
                } catch (ClassNotFoundException e) {
                    throw new IOException(StringUtils.toString("Read response data failed.", e));
                }
                break;

            // 异常对象不为空,且携带了 attachments 集合
            case DubboCodec.RESPONSE_WITH_EXCEPTION_WITH_ATTACHMENTS:
                try {
                    // 反序列化异常对象
                    Object obj = in.readObject();
                    if (obj instanceof Throwable == false)
                        throw new IOException("Response data error, expect Throwable, but get " + obj);
                    // 设置异常对象
                    setException((Throwable) obj);
                    // 反序列化 attachments 集合,并存储起来
                    setAttachments((Map<String, String>) in.readObject(Map.class));
                } catch (ClassNotFoundException e) {
                    throw new IOException(StringUtils.toString("Read response data failed.", e));
                }
                break;
            default:
                throw new IOException("Unknown result flag, expect '0' '1' '2', get " + flag);
        }
        if (in instanceof Cleanable) {
            ((Cleanable) in).cleanup();
        }
        return this;
    }
}
响应数据解码完成后,Dubbo 会将响应对象派发到线程池上。要注意的是,线程池中的线程并非用户的调用线程,所以要想办法将响应对象从线程池线程传递到用户线程上。我们在前面分析过用户线程在发送完请求后的动作,即调用 DefaultFuture 的 get 方法等待响应对象的到来。当响应对象到来后,用户线程会被唤醒,并通过调用编号获取属于自己的响应对象。下面我们来看一下整个过程对应的代码。
public class HeaderExchangeHandler implements ChannelHandlerDelegate {

    @Override
    public void received(Channel channel, Object message) throws RemotingException {
        channel.setAttribute(KEY_READ_TIMESTAMP, System.currentTimeMillis());
        ExchangeChannel exchangeChannel = HeaderExchangeChannel.getOrAddChannel(channel);
        try {
            if (message instanceof Request) {
                // 处理请求,前面已分析过,省略
            } else if (message instanceof Response) {
                // 处理响应
                handleResponse(channel, (Response) message);
            } else if (message instanceof String) {
                // telnet 相关,忽略
            } else {
                handler.received(exchangeChannel, message);
            }
        } finally {
            HeaderExchangeChannel.removeChannelIfDisconnected(channel);
        }
    }

    static void handleResponse(Channel channel, Response response) throws RemotingException {
        if (response != null && !response.isHeartbeat()) {
            // 继续向下调用
            DefaultFuture.received(channel, response);
        }
    }
}

public class DefaultFuture implements ResponseFuture {

    private final Lock lock = new ReentrantLock();
    private final Condition done = lock.newCondition();
    private volatile Response response;

    public static void received(Channel channel, Response response) {
        try {
            // 根据调用编号从 FUTURES 集合中查找指定的 DefaultFuture 对象
            DefaultFuture future = FUTURES.remove(response.getId());
            if (future != null) {
                // 继续向下调用
                future.doReceived(response);
            } else {
                logger.warn("The timeout response finally returned at ...");
            }
        } finally {
            CHANNELS.remove(response.getId());
        }
    }

    private void doReceived(Response res) {
        lock.lock();
        try {
            // 保存响应对象
            response = res;
            if (done != null) {
                // 唤醒用户线程
                done.signal();
            }
        } finally {
            lock.unlock();
        }
        if (callback != null) {
            invokeCallback(callback);
        }
    }
}
以上逻辑是将响应对象保存到相应的 DefaultFuture 实例中,然后再唤醒用户线程,随后用户线程即可从 DefaultFuture 实例中获取到相应结果。
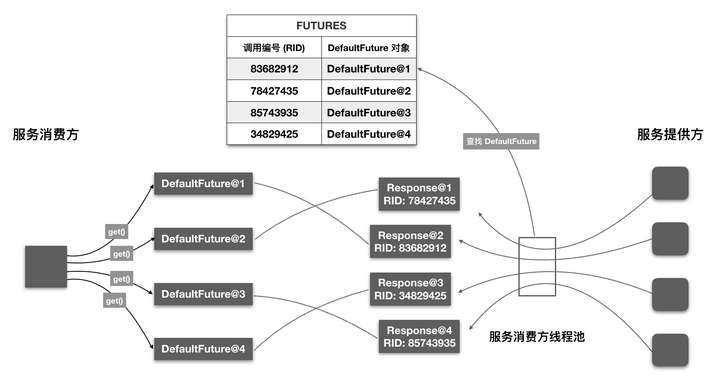
本篇文章在多个地方都强调过调用编号很重要,但一直没有解释原因,这里简单说明一下。一般情况下,服务消费方会并发调用多个服务,每个用户线程发送请求后,会调用不同 DefaultFuture 对象的 get 方法进行等待。 一段时间后,服务消费方的线程池会收到多个响应对象。这个时候要考虑一个问题,如何将每个响应对象传递给相应的 DefaultFuture 对象,且不出错。答案是通过调用编号。DefaultFuture 被创建时,会要求传入一个 Request 对象。此时 DefaultFuture 可从 Request 对象中获取调用编号,并将 <调用编号, DefaultFuture 对象> 映射关系存入到静态 Map 中,即 FUTURES。线程池中的线程在收到 Response 对象后,会根据 Response 对象中的调用编号到 FUTURES 集合中取出相应的 DefaultFuture 对象,然后再将 Response 对象设置到 DefaultFuture 对象中。最后再唤醒用户线程,这样用户线程即可从 DefaultFuture 对象中获取调用结果了。整个过程大致如下图:

参考内容
[1]《深入理解Apache Dubbo与实战》
[2]http://dubbo.apache.org/zh-cn/docs/user/quick-start.html
https://zhuanlan.zhihu.com/p/87133573